Table of Contents
Installing Amix
As for any early 1990's operating system (especially Unix), installing Amix is not completely straight-forward. Here are some notes to help you through the process on either real hardware or in WinUAE/FS-UAE emulators on a PC.

Requirements
Required stuff (both emulator and on real hardware installation):
- Make sure you have compatible hardware used or emulated
- An image file of the installation tape or a copy of it on a real tape on SCSI ID 4*
- An image files of Install and Boot floppies (720k) or physical disks
- A SCSI hard disk drive (or a modern replacement like scsi2sd) with preferably at least 300 MB (complete install) at SCSI ID 6*
- Plenty of time
*) The SCSI addresses are critical, they are hard-coded into the installation script.
The WinUAE Amiga emulator has supported running Amix since 2013 (version 2.7.0 onwards). Users of macOS and Linux can also run WinUAE with WINE (outside the scope of this article).
Videos on YouTube: Amix install in WinUAE - First boot (installing the patch disk)
- ZIP-archive of the contents from the original 2.1 installation tape (102 MB)
Configuring WinUAE
Configure WinUAE to use the following options. Options not listed explicitly should be left at their defaults.
- Hardware / CPU and FPU

- CPU: select 68030 + MMU + 68882 + FPU
- CPU Emulation Speed: Fastest Possible.
- Hardware / Chipset:
- Full ECS
- Chipset Extra: A3000
- Wait for Blitter
- Collision Level: Sprintes and Sprites vs Playfield
- Hardware / ROM:
- “KS ROM v2.04 (A3000) rev 37.175 (512k)” or another appropriate A3000/A3000T ROM (“ROM v3.1 (A3000) rev 40.68 (512k)” works, too)
- Hardware / RAM:
- Chip: 2 MB
- Motherboard Fast: 16 MB (see note on RAM below)
- Hardware / Floppy drives:
- Attach amix_2.1_boot.adf as DF0
- Hardware / CD & Hard Drives:
- Add SCSI Tape Drive → Select Archive or Plain file → browse path to tape image ZIP, attach as HD Controller: SCSI4 (see note on SCSI below)
- Add Hardfile → New hard disk image file → 450-900 MB → Create. Attach as SCSI6, Device name: DH0, Read/Write enabled, Enable RDB mode. This will be your hard disk drive to install on. See note below on hard disks.
Memory: AMIX kernel is hard-coded to recognize only 4-16 megs of Fast RAM. RAM cards will not work since the kernel seems to map the memory address of the SCSI drive wrong with any more than 16 MB RAM. Apparently you can add 32-bit memory to your config: AMIX will ignore it. This might be useful if you go to install a dual-booting system and want to add RAM that will work in Workbench side.
Hard disks and partitions The minimum installation of AMIX 2.1 takes less than 70 MB of space, installing everything on the tape takes about 300 MB. Do not attempt to use too big hard disk image, you are likely to run intro trouble! At least up to 4GB drives should work fine. You can leave empty space during partitioning if you want to install Workbench on the disk too.
SCSI IDs: The SCSI addresses are critical, they are hard-coded into the installation and the script won't look anywhere else than SCSI4 for the install tape. If the installation script complains that it's not seeing any hard disks, check the SCSI address'.
Other settings you might want to try
- Chipset / External Display Hardware:
- A2024 (built-in support for 256-color X-Window) or Picasso II.
- Expansions:
- A2065: an Ethernet card supported by AMIX that can be used to connect AMIX to a real network under WinUAE. Windows users will also need to install WinPCAP if they wish to connect AMIX to a real network (note: WinPCAP does not under WINE).
Go to the configuration page and select 'Save as“ to save your configuration. Each time you start WinUAE you may need to “Load” this configuration.
You are ready to go - Start!
The Installation Process
Power the system on, and the floppy will begin to boot. Once the drive light goes out it may take a few seconds for the next prompt to appear, so don't be too concerned if nothing happens right away.
Note that if you have an Amiga that requires a superkick floppy you do not need to load kickstart before loading AMIX. In fact it just takes up RAM, so don't load it unless you want to run AmigaOS.
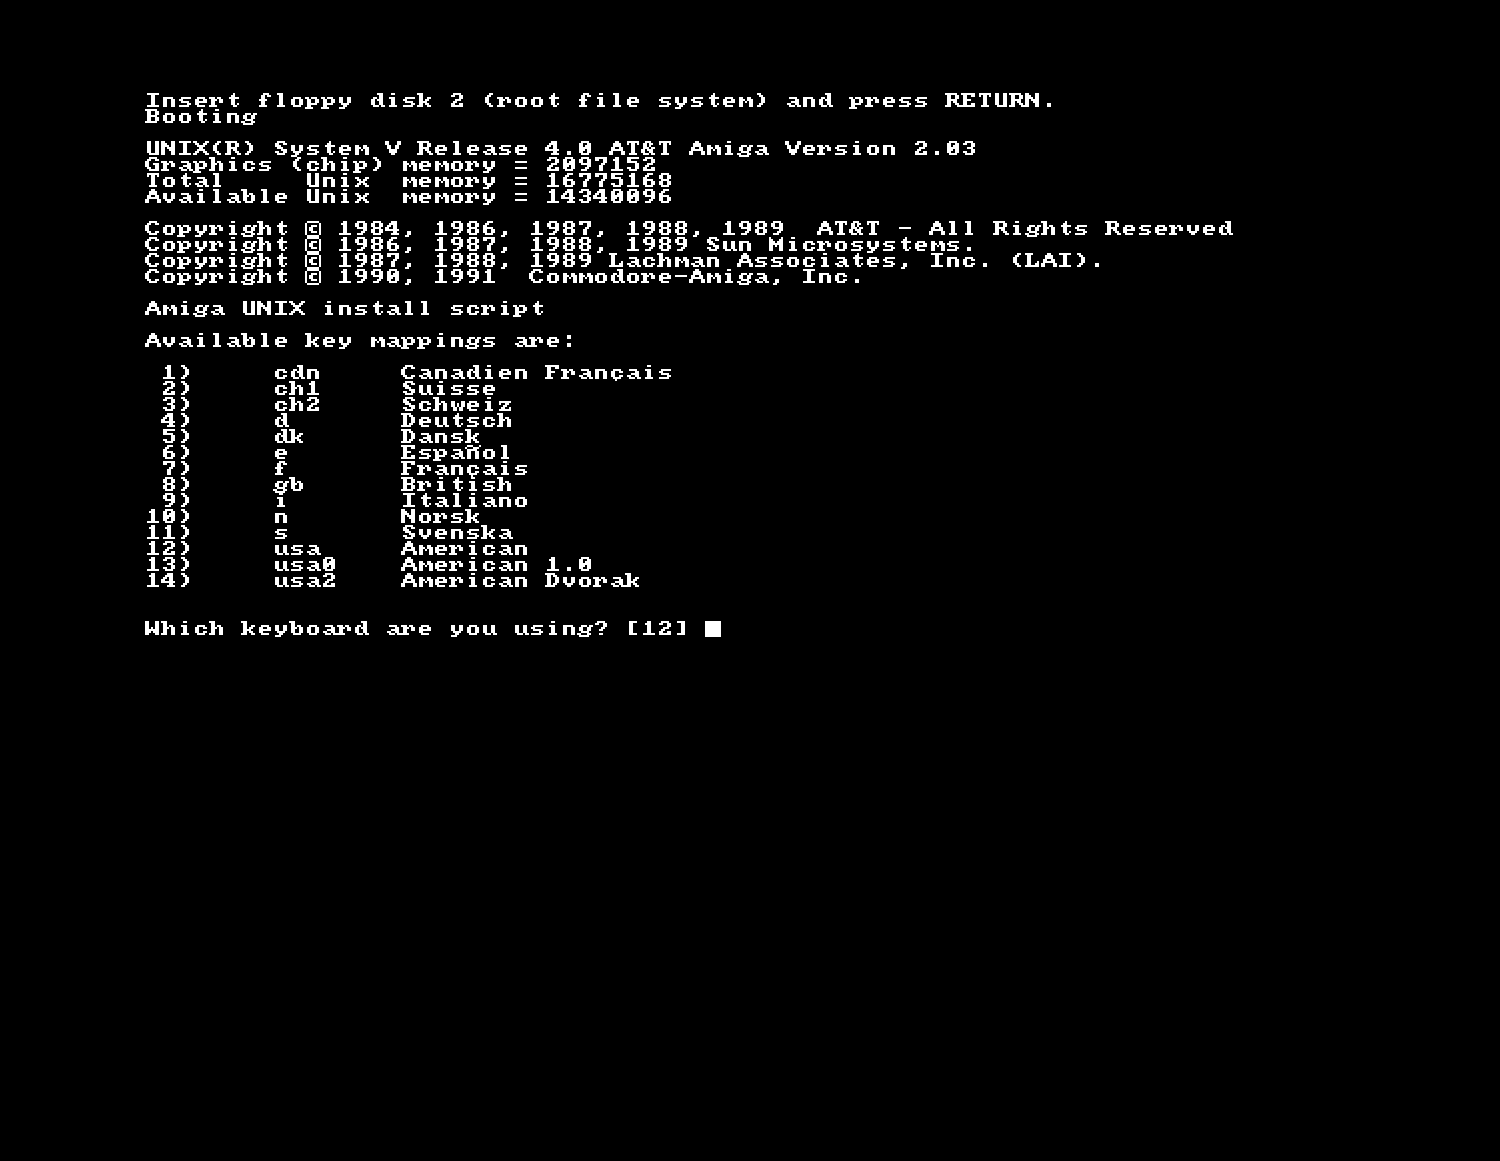 After boot has completed, you will be prompted to insert the root floppy. It contains the root filesystem used for AMIX installation script. You may be familiar with this concept from Linux or some other UNIX. If not, don't worry about it. More time will pass, and you will enter the installation script.
First prompt is for language. Select wisely (the default is what most people will want). Then it's going to ask you “do you want to install or repair”? In all dialogs the selection shown in square brackets is the default option and pressing return will select that. To select other option, type it and press return.
The next prompt will be to insert the UNIX install tape. If you attached it earlier to SCSI4, just proceed, otherwise do it now! If the install fails on the tape, you'll need to restart it.
The script will check for a suitable UNIX partition table on the attached drives. If it finds one that's suitable — great! If not, you will need to create one. Be sure to read the notes above regarding large drives and partition sizes. Most importantly, keep your partitions in the neighborhood of 1GB, max. And make swap. Lots of swap.
Once that's all set up, you'll be prompted to choose the filesystem type. Default is s5 filesystem, but choose ufs filesystem instead. Trust me.
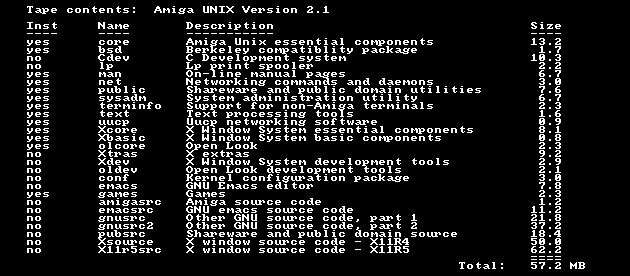 After the filesystem type has been selected, you are prompted for the type of installation. Unless you are desperately short on drive space, it's highly recommended that you opt to install everything. It takes longer, but it's much faster than digging up what you want off the tape later on. That being said, knock yourself out if you'd like to try manually adding packages later on.
Filesystems are created. This will, like the script says, take some time. Next the script helpfully retensions the tape, which takes even more time. Then it reads the tape and installs the packages, which takes freaking forever so go do something else for a while. The installation manual states that “The standard installation takes about an hour; installing all the packages takes longer”.
Keep your fingers crossed.
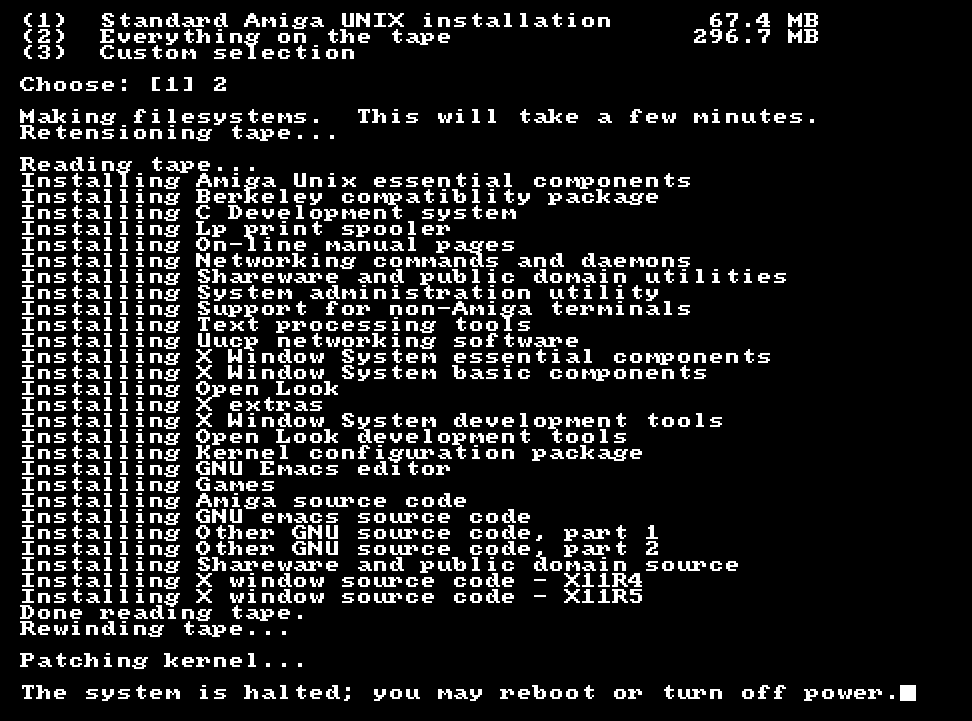 After the package installation is complete, the kernel will be patched and you will be prompted to reboot the system. Remove floppies and the tape. Use CTRL-Amiga-Amiga to reboot into your new system and begin the post-installation phase. Almost done!
Post-installation
Immediately upon reboot you will be given a series of prompts to finish configuring your system.
First prompt is for nodename of the machine. This is the same as the hostname, for example “amix” or “amixbox” or something. It doesn't really matter what you call it as long as it is unique on your network (if you have no network, it doesn't matter at all). The next prompt is for domain name, you can take the default or put in bogus.com or whatever you like.
Next it will ask if you want to create a hosts file. You may only get this prompt if you have a network card. If you do have a network card, say yes to this prompt and assign the values requested.
Timezone is next. The default is Eastern time. Pick your time zone. You will be asked to set the date. At this point you can't set it beyond 1999, so don't try. Just enter like 123199 for the date for now, you can fix it later. You'll be asked for the time, go ahead and set that to the correct time.
Password assignment is next. You should set a password to all the accounts prompted for, otherwise they will be blank! You can create a user account here, this is recommended as well.
Finally, you will be asked if you are using a high resolution monitor. If you are not using an A2041 board, at this point always answer NO to this and to the following “X windows for a color graphics card” question. Its probably safer to set those up later, if you have them. If you're running 2.1 you will be prompted about Netnews… answer appropriately (probably no). At this point configuration of the system is completed and it will finish booting to a login prompt.
 Congratulations, you now have a working Amix setup!
Now would be a good time to take a backup of the hard disk image. The file will be couple of gigs (depenging on the size you selected) but it will be worth it if the installation gets borked (which will happen easier than you might think).
Before you begin settling in you'll probably want to install the 2.1 patch disk and replace the built-in setclk with a version that is Y2K compatible (otherwise you'll get 'date: bad conversion' errors).
Remember to use shutdown command before turning off power (or stopping the emulator)!
Common errors during installation
- WinUAE: sort: fatal: line too long during package installation: make sure that 'more compatible' is NOT selected in Hardware/Chipset, see here.
- WinUAE: kernel panics: make sure 'More Compatible' is NOT selected (in CPU options)
- WinUAE: kernel panics: make sure MMU is ON / JIT is OFF
FS-UAE
 Details coming later. Basically just duplicate the settings described above for WinUAE and add the tape drive configuration manually into the config file (as currently there are no GUI options to do this). See the example below (last line is the tape drive config pointing to a directory with the tape files). “hard_drive_0_type = rdb” seems to be required (as the installer won't detect any drives without it).
Thanks to Warty on EAB forums.
Tips: set floppy speed to 200% and while installer is copying files, switch to warp mode (cmd+W) to save some time installing. While in warp mode, screen refresh might get corrupted, but it will clear once you deactivate warp mode.
[fs-uae]
amiga_model = A3000
floppy_drive_volume_empty = 0
floppy_image_0 = <path to file>/amix_21_boot.adf
floppy_image_1 = <path to file>/amix_21_root.adf
floppy_image_2 = <path to file>/amix_21_patch.adf
hard_drive_0 = /<path to hardfile>/a3000ux.hdf
hard_drive_0_controller = scsi6
hard_drive_0_type = rdb
kickstart_file = Kickstart v3.1 rev 40.62 (1993)(Commodore)(A3000).rom
motherboard_ram = 16384
uae_uaehf0 = tape0,ro,:/<path to amix tape>/amix_21_tape,0,0,0,512,0,,scsi4,SCSI1